When you have solar panels with micro-inverters, any energy you don't consume gets reinjected into the grid, often for free. That's energy you produced but can't use later. What if you could store that surplus during the day and feed it back into your home at night? That's exactly what this DIY board does.
In short:
- ESP32 + Domoticz Orchestration: The ESP32 monitors your solar surplus in real-time via Domoticz and MQTT, deciding exactly when to charge and when to reinject.
- Dual-Phase Energy Management: During the day, excess solar charges the battery through a switched PSU and MPPT controller; at night, stored energy flows back through a Hoymiles HM-350 micro-inverter into your home.
- Cascading Battery Charging: The Redodo LiFePO₄ charges first, and when it's nearly full, a MOSFET redirects charge to a secondary Bluetti battery.
You might wonder: why not just buy a Victron Multiplus II? I started this project well before mainstream home storage solutions appeared. More importantly, actual commercial solutions (Anker, Zendure, Ecoflow) rely on cloud services and WiFi, whether US or Chinese. My setup is fully local. No cloud dependency. No vendor lock-in. In 10 years will they still work? And crucially, a DIY approach is extensible: swap components, add batteries, change the logic, all without waiting for a firmware update from a corporation.
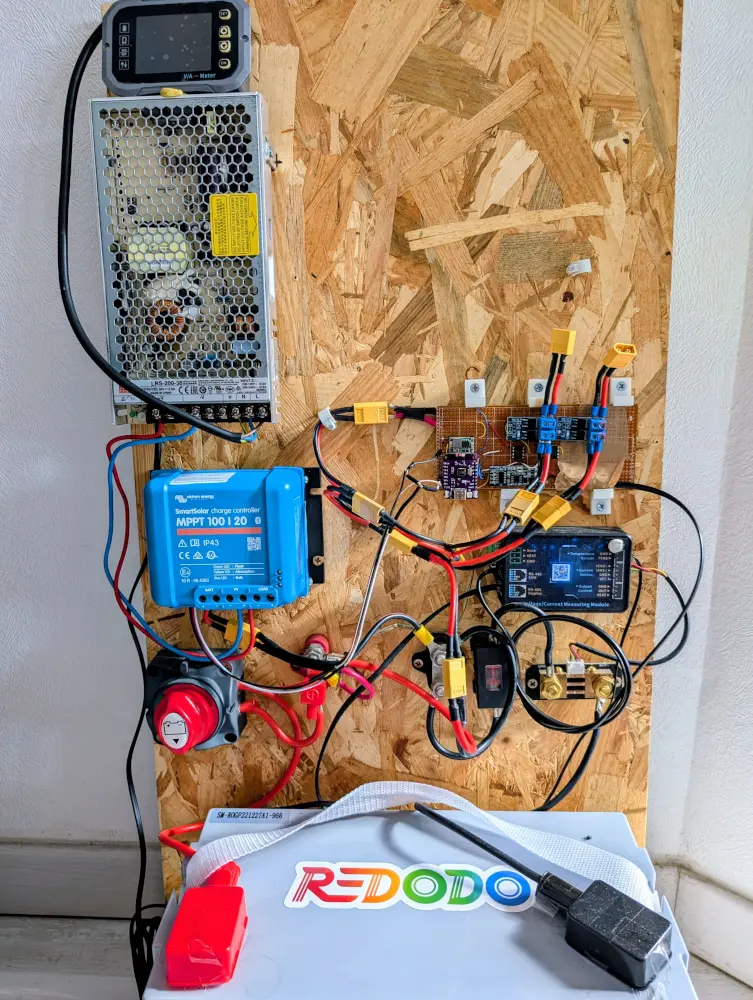
The heart of the system is a custom perfboard with an ESP32, two MOSFET modules, and XT60 connectors. All coordinate energy flow between solar panels, batteries, and the grid.
System Architecture
                    AC Mains
                       │
                       ▼
              Smart Socket (WiFi)
                       │
                       ▼
            Mean Well LRS-200-36
                    (36V DC)
                       │
          ┌────────────┘
          │ (switched by smart socket)
          ▼
    Victron SmartSolar MPPT 100/20 ◄── VE.Direct ── ESP32
          │
          ▼
    REDODO LiFePO₄ Battery
          │
   Disconnect Switch ── Fuse ── Positive Bus
          │
    ┌─────┴─────┐
    │           │
  MOSFET #1  MOSFET #2
    │           │
    ▼           ▼
  Bluetti    Hoymiles HM-350
  Battery    (DC → AC reinjection)

  Battery Negative ── Shunt ── System Negative
                             │
                    Current Measurement Module
                             │
                          ESP32
                             │
                    MQTT ↔ Domoticz
Mean Well LRS-200-36 Power Supply
Mounted at the top of the board.
This 36V DC power supply is the bridge between AC mains and the MPPT charger. It's powered through a smart socket that the ESP32 activates via Domoticz when surplus solar is detected.
Domoticz detects surplus → ESP32 → Smart Socket ON
                                         │
                                         ▼
                                  Mean Well PSU (36V)
                                         │
                                         ▼
                                  Victron MPPT input
The key insight: the PSU replaces the solar input on the MPPT. When there's excess solar, the ESP32 switches on the PSU, so the MPPT charges the battery from AC that would otherwise go to the grid for free.
Victron SmartSolar MPPT 100/20
Middle left of the board.
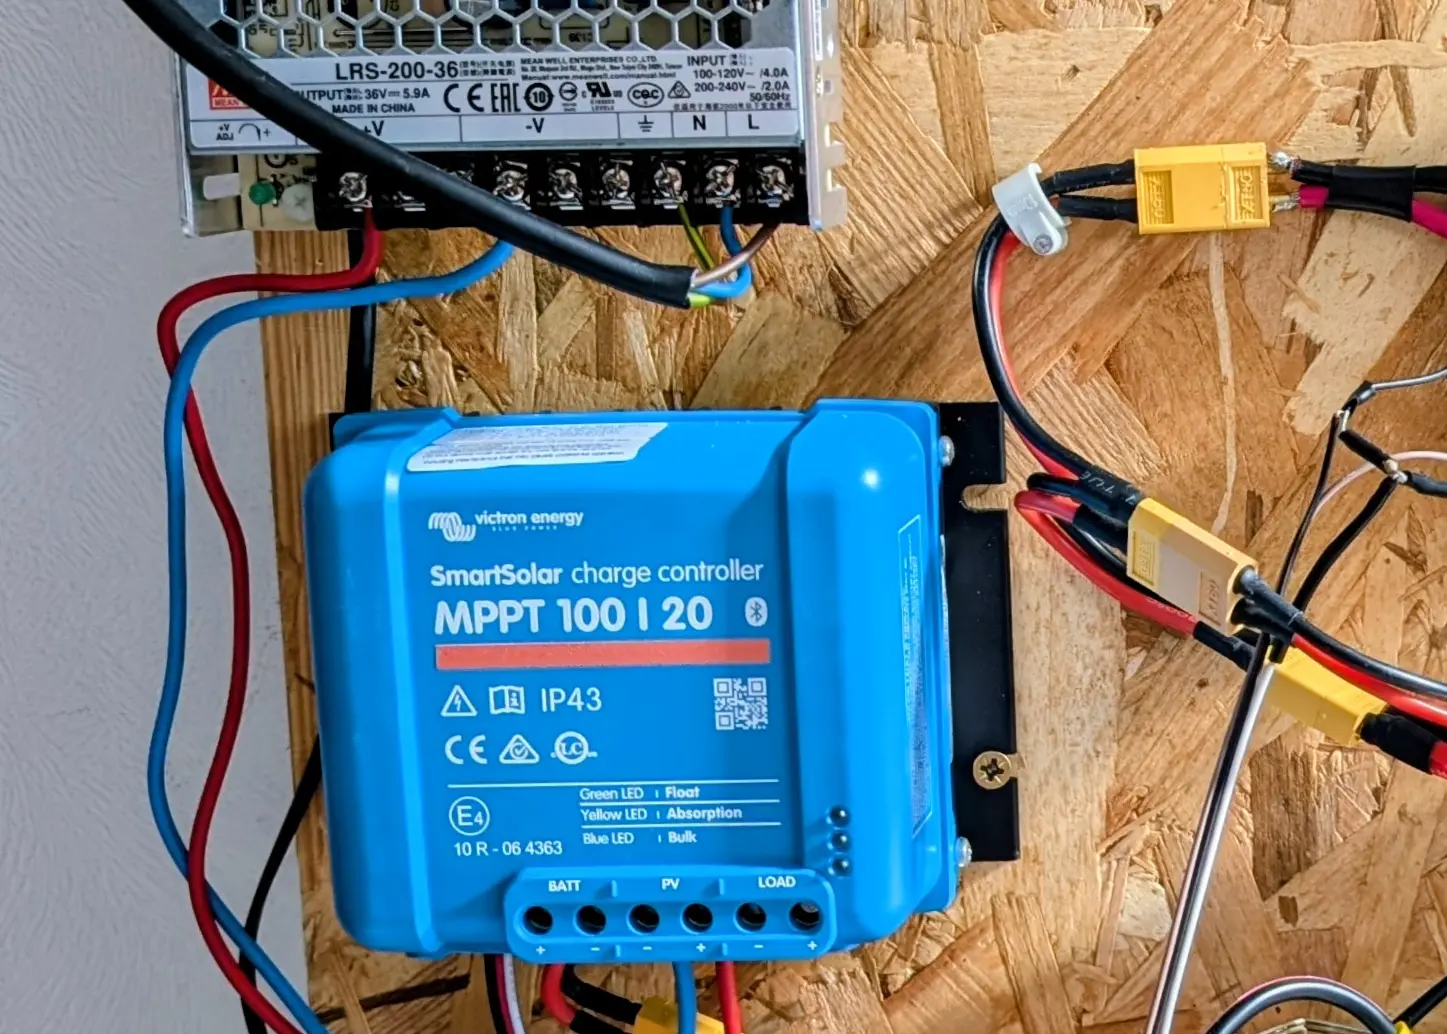
This is the charge controller, and it was chosen for one critical reason: it's the only charger that allows charging current adjustment in 0.1A steps. No equivalent exists on AliExpress at the time of writing.
That granularity matters. The ESP32 communicates with the Victron via VE.Direct serial, adjusting the charge current in real-time to precisely match the available surplus. No over-charging, no under-charging. Just exact matching to the solar excess.
ESP32 ── VE.Direct (UART) ──► Victron MPPT
                                 │
                                 ▼
                          Charge Current = f(surplus)
When the PSU is active (daytime surplus), the MPPT charges from it. When it's not, the MPPT can also accept solar panel input. The ESP32 manages which source is active.
REDODO LiFePO₄ Battery
Bottom of the board.
The primary energy storage. A 12.8V LiFePO₄ with an internal BMS that handles cell balancing and protection.
Connected to:
- MPPT charger output
- Measurement shunt (negative path)
- Disconnect switch (positive path)
- MOSFET outputs for cascade charging and reinjection
Safety: Disconnect Switch and Fuse
Bottom left and center.
The disconnect switch is a large red rotary switch on the battery positive path. It provides manual isolation for maintenance and emergency shutdown.
The fuse holder protects downstream wiring and MOSFETs from fault current.
Battery + ── Disconnect Switch ── Fuse ── System Positive Bus
Never skip physical safety isolation on a battery that can deliver hundreds of amps.
Current Shunt and Measurement Module (KG110F)
Bottom right and middle right.
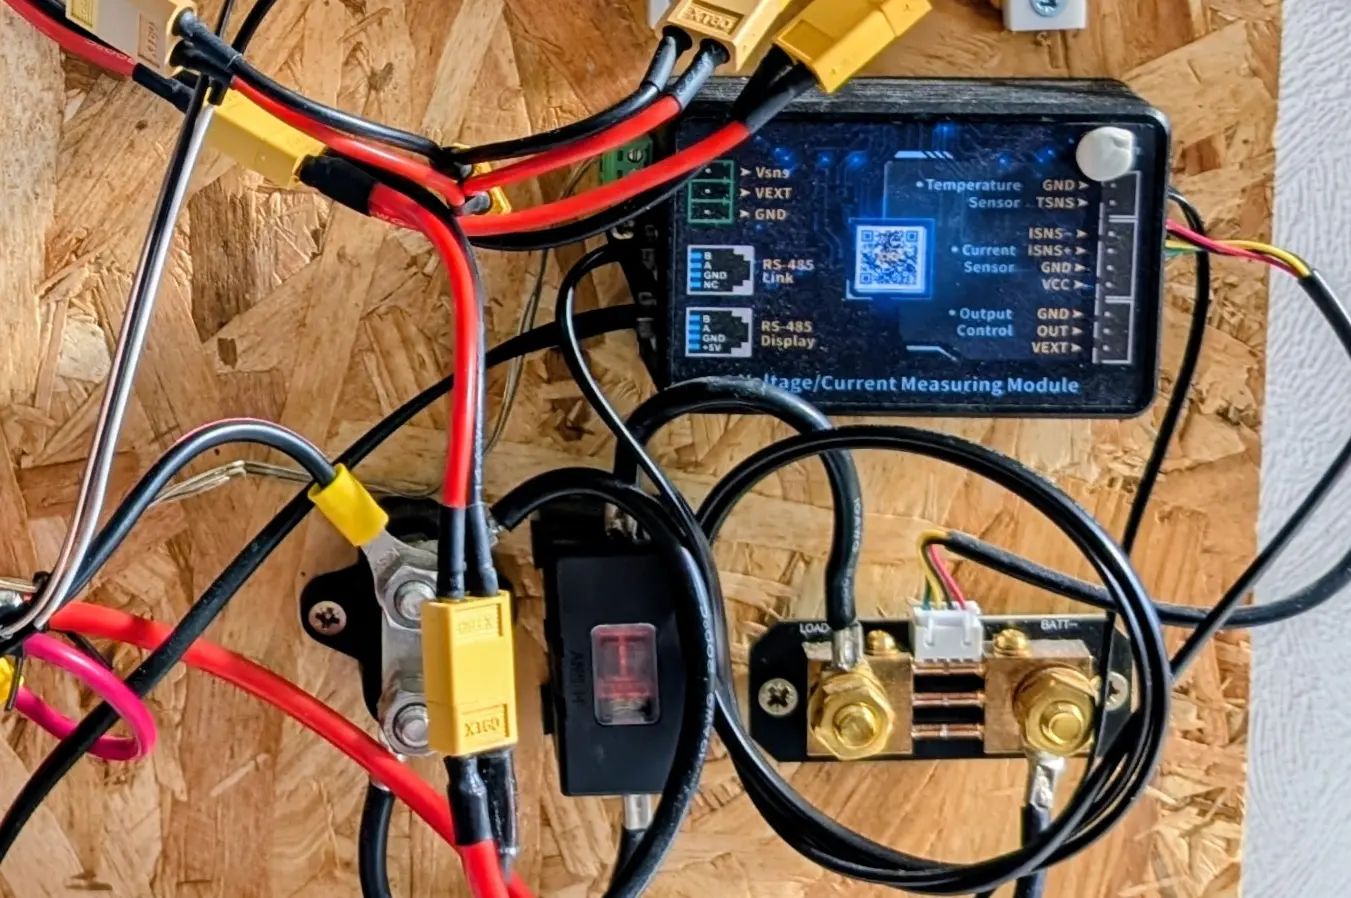
The shunt is a brass block in the battery negative path. Every charge and discharge current flows through it. The shunt is paired with a KG110F measurement module that reads the shunt voltage and communicates with the ESP32 over RS485.
The KG110F calculates:
- Current (A)
- Voltage (V)
- Power (W)
- Amp-hours (Ah)
- Watt-hours (Wh)
- State of charge (%)
- Temperature (via probe)
KG110F ── RS485 ──► ESP32
Using RS485 instead of analog sensing means the ESP32 gets clean, noise-free data over longer cable runs. This gives the ESP32 full visibility into energy flow. Essential for deciding when to charge, when to stop, and when to reinject.
ESP32 Controller
On the perfboard. The brain of the operation.
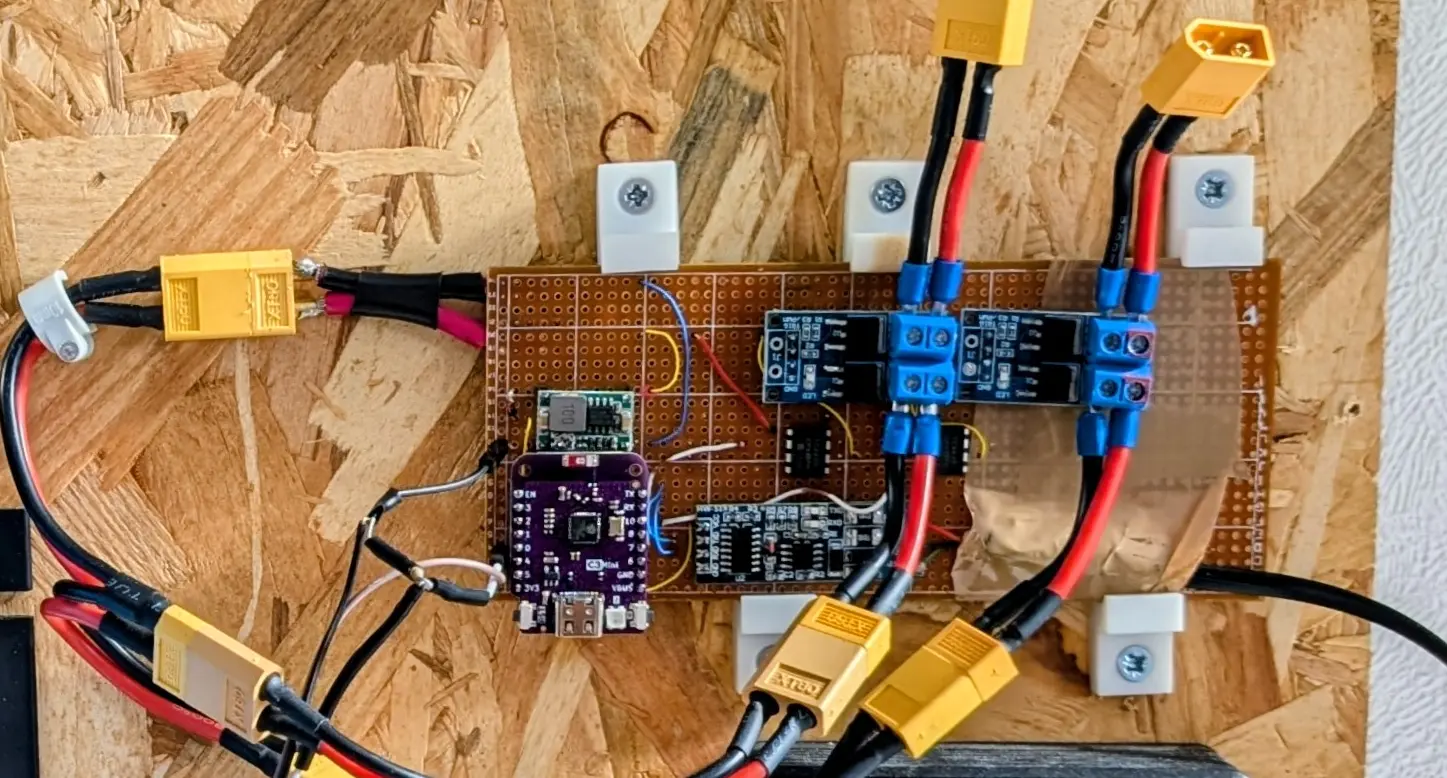
The ESP32 is the central intelligence, handling:
- VE.Direct serial → communicates with the Victron MPPT, adjusts charge current
- MQTT → receives Domoticz data (solar production, AC reinjection, grid import)
- MOSFET gate control → switches charge and discharge paths
- Smart socket control → enables/disables the Mean Well PSU via WiFi
ESP32
  ├── WiFi → Smart Socket (PSU power)
  ├── VE.Direct → Victron MPPT
  ├── MQTT ← Domoticz (solar data)
  ├── GPIO → MOSFET #1 (Bluetti)
  └── GPIO → MOSFET #2 (Hoymiles)
The ESP32 software was vibe-coded in CircuitPython using free AI models. The whole firmware, from VE.Direct communication to MQTT telemetry, was written with AI assistance.
MOSFET Module #1: Bluetti Cascade Charging
On the perfboard.
When the Redodo battery approaches full charge, the ESP32 activates MOSFET #1 to redirect charging current to a secondary Bluetti battery. This cascading approach ensures no surplus energy is wasted.
Redodo nearly full → ESP32 → MOSFET #1 ON → Bluetti charges
MOSFET Module #2: AC Reinjection via Hoymiles HM-350
On the perfboard. This is the most important output.
During the night (or whenever solar production drops), the ESP32 activates MOSFET #2, connecting the Redodo battery to a Hoymiles HM-350 micro-inverter. The HM-350 converts DC back to AC and reinjects it into the home, offsetting grid consumption.
Night / no solar → ESP32 → MOSFET #2 ON → Hoymiles HM-350 → AC into home
This closes the loop: excess solar stored during the day is returned at night.
XT60 Connectors
On the perfboard and wiring harness.
XT60 connectors provide modular high-current connections throughout the system. They're used for:
- Battery input
- Output to Bluetti
- Output to Hoymiles HM-350
- External equipment connections
They make the system easy to reconfigure. Plug and unplug modules without soldering.
How It Works: The Two Phases
Day Phase: Store Excess Solar:
Micro-inverters produce AC → surplus detected by Domoticz
         │
         ▼
ESP32 activates smart socket → Mean Well PSU outputs 36V
         │
         ▼
Victron MPPT charges Redodo (current adjusted via VE.Direct)
         │
         ├── Redodo nearly full? → MOSFET #1 → Bluetti
         │
         └── No more surplus? → ESP32 turns off smart socket
Night Phase: Reinject Stored Energy:
Solar production drops → Domoticz reports import from grid
         │
         ▼
ESP32 activates MOSFET #2 → Redodo powers Hoymiles HM-350
         │
         ▼
HM-350 converts DC → AC → reinjected into home
         │
         ▼
Grid import reduced or offset entirely
Conclusion
Building your own solar storage and reinjection system gives you full control. No cloud dependency. No vendor lock-in. The freedom to evolve the design as your needs change. The components are affordable, well-documented, and widely available.
Safety is paramount: always use proper fusing, a disconnect switch, and respect the BMS limits of your batteries. Never skip physical isolation on high-current paths. I will add more isolation to exposed wires and connections.
The extensibility of this approach is its real strength. I'll soon be upgrading to 2×12.8V batteries without changing a single component on the board. And when I move to 48V, only the power supply needs swapping. Everything else stays.
If you've built something similar or have questions about the build, please comment below 😉


Speak your mind: