The CircuitPython installation guide is a comprehensive resource for tech enthusiasts looking to get started with CircuitPython. CircuitPython is a programming language based on Python that is specifically designed for microcontrollers and single board computers. It provides an easy and beginner-friendly way to program these devices and interact with hardware components.
This installation guide will walk you through the process of downloading and installing CircuitPython on your device. It will cover both microcontrollers and single board computers, providing step-by-step/instructions and system requirements for each platform. Additionally, it will guide you through setting up the CircuitPython environment, connecting to the device, and writing and running CircuitPython code.
What is CircuitPython?
CircuitPython is a programming language and development environment that makes it easy to program microcontrollers and single board computers. It is based on Python, a popular and beginner-friendly programming language, but is specifically optimized for hardware projects.
With CircuitPython, you can easily write code to control and interact with a wide range of hardware components, such as sensors, displays, motors, and more. It provides a high-level interface that abstracts away the complexities of low-level hardware programming, allowing you to focus on your project and quickly prototype ideas.
One of the key benefits of CircuitPython is its simplicity and ease of use. Unlike traditional embedded systems programming, which can be complex and require specialized knowledge, CircuitPython allows beginners to get started quickly and experienced developers to iterate and experiment rapidly.
CircuitPython is designed to be cross-platform, meaning it can run on various microcontrollers and single board computers, such as Arduino, Raspberry Pi, and Adafruit boards. This versatility makes it accessible to a wide range of hardware enthusiasts and allows for seamless integration with existing projects and ecosystems.
Whether you're a beginner or an experienced developer, CircuitPython provides a powerful and flexible platform for hardware projects. It combines the simplicity of Python with the capabilities of microcontrollers and single board computers, opening up a world of possibilities for creative and innovative projects.
System Requirements
To use CircuitPython, you will need to ensure that your system meets the minimum requirements. The system requirements may vary depending on the specific microcontroller or single board computer you are using, but here are some general guidelines:
-
Processor: Most microcontrollers and single board computers should have a processor capable of running CircuitPython. Check if your device is in this list.
-
Memory: CircuitPython requires a certain amount of flash memory to run properly. Make sure your device has enough RAM and Flash storage space to accommodate CircuitPython and any additional libraries or code you may want to use.
-
Documentation: Familiarize yourself with the specific system requirements and recommendations of your microcontroller or single board computer. They may have additional requirements or recommendations that are specific to your device.
By ensuring that your system meets the necessary requirements, you can have a smooth experience using CircuitPython and avoid any compatibility issues or performance issues.
Downloading and Installing CircuitPython
Downloading CircuitPython is the first step towards getting started with this powerful programming language. Here's a guide on how to download CircuitPython:
-
Connect your device: Use a USB cable to connect your microcontroller or single board computer to your computer.
-
Visit the CircuitPython website: Go to the official CircuitPython website to access the latest version of CircuitPython.
-
Select your device: Choose the microcontroller or single board computer that you will be using with CircuitPython. Make sure to select the correct model and version to ensure compatibility.
-
Download the firmware: Locate the download link for the firmware (UF2 or BIN) file specific to your device. Click on the link to start the download process.
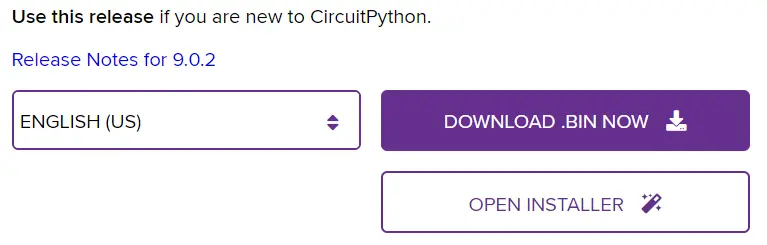
On some devices you will have the option for install and upgrade the firmware directly from your browser, thanks to serial port access from the web browser. In that case you'll see this "open installer" button:
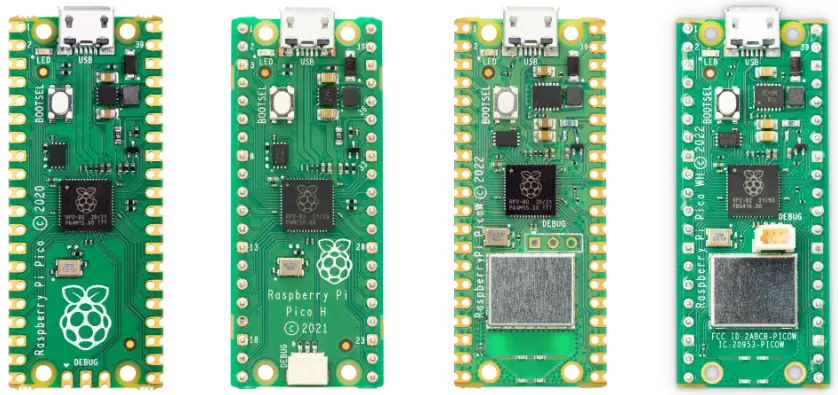
On devices with UF2 support, like the Raspberry PI Pico, you will need to enter bootloader mode before installing CircuitPython. Most of the time you have to press a 'BOOT' button on your board before connecting the USB cable. Refer to the documentation of your specific device for instructions on how to enter bootloader mode, then follow the instructions:
-
Locate the bootloader drive: After connecting the microcontroller, you should see a new drive appear on your computer. This is the bootloader drive of your microcontroller.
-
Copy the CircuitPython firmware file: Download the CircuitPython firmware file for your specific microcontroller model from the official CircuitPython website. Copy the firmware file and paste it into the bootloader drive.
-
Eject or disconnect the microcontroller: Safely eject or disconnect the microcontroller from your computer.
-
Restart the microcontroller: After disconnecting, restart the microcontroller to complete the installation process. The microcontroller will now run CircuitPython.
With CircuitPython successfully installed on your microcontroller, you can start writing and running CircuitPython code to control and interact with hardware components connected to the microcontroller.
Remember to consult the documentation of your specific microcontroller for any additional installation steps or considerations.
Installing CircuitPython on Single Board Computers
Installing CircuitPython on single board computers (SBCs), like the Raspberry PI 3 or 4, is a straightforward process that allows you to unlock the full potential of these versatile devices. Circuit Python on SBCs is supported by installing a compatiblity layer called 'Blinka'. Here's a step-by-step guide on how to install CircuitPython on SBCs:
-
Prepare your SBC: Ensure that your SBC is powered off and properly connected to a display, keyboard, and mouse.
-
Check if your SBC is supported on the Blinka page.
-
Log into your SBC and run the following commands, line-by-line.
sudo apt install python3-venv
python3 -m venv env --system-site-packages
source env/bin/activate
sudo apt-get install -y i2c-tools libgpiod-dev python3-libgpiod
pip3 install --upgrade RPi.GPIO
pip3 install --upgrade adafruit-blinka
Run these commands to enable the various interfaces such as I2C and SPI if you have a Raspberry PI:
sudo raspi-config nonint do_i2c 0
sudo raspi-config nonint do_spi 0
sudo raspi-config nonint do_serial_hw 0
sudo raspi-config nonint do_ssh 0
sudo raspi-config nonint do_camera 0
sudo raspi-config nonint disable_raspi_config_at_boot 0
Once CircuitPython is installed on your SBC, you can start writing and running CircuitPython code to control peripherals, interact with the GPIO pins, and create exciting projects. Make sure to consult the documentation of your specific SBC for any additional installation steps or considerations.
Setting up the CircuitPython Environment
Setting up the CircuitPython environment is an essential step to ensure a smooth development experience. Here's a guide on how to set up the CircuitPython environment:
- Install the necessary drivers: Depending on your operating system and the microcontroller or single board computer you are using, you may need to install specific drivers to establish a connection.
- Choose an Integrated Development Environment (IDE): Select an IDE that supports CircuitPython development, such as Mu, Thonny, Sublime text, emacs or IDLE. Install the IDE on your computer.
- Connect to the device: Use a USB cable to connect your microcontroller or single board computer to your computer. You should see a new drive called 'CIRCUITPY'. You can directly edit the .py files on this drive with your IDE.
- Some microcontrollers that do not support native USB. Those boards cannot present a CIRCUITPY drive. This includes boards using ESP32 or ESP32-C3 microcontrollers. In that case, use the 'Thonny' IDE which supports transfers over a serial port.
Using the CircuitPython REPL
The CircuitPython REPL (Read-Eval-Print Loop) is a powerful tool for interacting with your device and testing your code in real-time. Here's a guide on how to use the CircuitPython REPL:
-
Open the REPL: Launch your chosen Integrated Development Environment (IDE) and navigate to the Serial Monitor or REPL section. You can use also your favorite serial console.
-
Establish the connection: Connect your microcontroller or single board computer to your computer and select the appropriate port in the Serial Monitor or REPL section. Make sure the baud rate is set correctly.
-
Start the REPL: Click the Connect or Open button in the Serial Monitor or REPL to start the REPL session.
-
Enter commands: In the REPL, you can enter Python commands and see the results immediately. This allows you to experiment with code, test functions, and interact with hardware components.
-
Access device features: Use the REPL to access device-specific features and functionality. For example, you can read sensor data, control motors, or toggle GPIO pins directly from the REPL.
The CircuitPython REPL is a valuable tool for debugging and exploring your CircuitPython projects. It provides an interactive environment to test code snippets, troubleshoot issues, and get real-time feedback from your device.
Getting Help and Community Support
Getting help and community support is essential when working with CircuitPython. Here are some ways to seek assistance and connect with the CircuitPython community:
- Online forums and communities: Join online forums and communities dedicated to CircuitPython, such as the Adafruit Forums or the CircuitPython subreddit. Post your questions or issues and receive help from experienced users and contributors.
- Documentation and guides: Consult the official CircuitPython documentation and guides available on the CircuitPython website. These resources provide in-depth information, tutorials, and troubleshooting tips.
- GitHub repository: Visit the CircuitPython GitHub repository to browse through the source code, report bugs, or contribute to the project. The GitHub repository is a great place to connect with developers and contributors.
- Local meetups and events: Check for local meetups or events related to CircuitPython and attend them to meet fellow enthusiasts, share ideas, and learn from each other.
By engaging with the CircuitPython community, you can gain valuable insights, receive support, and collaborate with like-minded individuals who share your passion for CircuitPython and hardware projects.


Speak your mind: